Tuesday, January 31, 2012

Cheap and Efficient Homemade Detergent!

You know what I get tired of? Okay, maybe that wasn't a very good question to narrow anything down when it comes to me. I'll go ahead and give it to you. Paying for things that don't work...and paying a lot of money for things that don't work or work as they claim. One of those things is dishwasher detergent. I'm pretty sure I've used everyone on the shelves and there is always something that doesn't work as it says. So, knowing there had to be a solution out there to making it myself, I went on a hunt and came across this

I must say, after playing around with it and finding the right combination of adding it to my wash and prewash, it works very well. I put approximately $20.00 into it since I had to buy a canister. However, if you have one, you can do it for between $12.00-$15.00. I've been using it since the beginning of January and I can't even tell that I've taken any out of the container. So I'm willing to bet this is going to last a very, verY, veRY, long time! 

There are a few things that I did do differently. Not really trusting the lemonade drink mix (she said it may turn your wash compartment yellow), I did go with citric acid. FYI:  One package of lemonade drink mix= 1/2 T of citric acid. Vinegar also ended up being a friend of mine in this adventure, so if you don't have a bottle handy, grab one. Whatever size is up to you, just know that per load you are going to use 1/2 T of vinegar. A 1/2 T measuring scoop wouldn't hurt either.

Here is the ingredient list that I ended up with: 

1 box of Borax (the 4 lb 12 oz box)
1 box Arm & Hammer Super Washing Soda (the 3lb 7 oz box)
12 T citric acid 
3 cups epsom salts
Lemi Shine Rinse Aid (dry form)
Bottle of Vinegar

***These ingredients can be found in the detergent aisle. At Walmart, I found everything right next to the dishwashing detergent. Hmmm. To think it's been there the whole time and I just looked over it. Citric acid is something you may need to go to where the canning supplies are. I actually order my citric acid in bulk and it's a lot cheaper. If the citric acid is too pricey, you can always go with the original idea, (which again can be found here.), and use the lemonade drink mix packages. 

What To Do: 
***Before you start pouring, hunt down a huge bowl or something to mix it in because it is quite a lot. You need to be able to mix it well, so unless the canister you are putting it in is big enough to do that, you'll have to mix it in something else.

1) All you do is mix the first four ingredients and then carefully pour into your storing container. I say carefully because you may inhale quite the cloud of white powder, otherwise. 

To Use:
***It really does only take the 1 T of the detergent. I think it's going to depend on your dishwasher on how and where to apply it. She doesn't specifically recommend where to apply, but I can assume the main wash would be safe to bet on. She does recommend on using the Lemi Shine to sprinkle about a tablespoon in the bottom of the dishwasher before you start. Honestly, this combination worked okay enough, but my glasses weren't as clear as I like and I think it could have done a little better in the wash process.

I have a Whirlpool Gold Quiet Partner IV and it's very efficient, so I knew there was no reason this should not work well. What worked best for me was to:

1) Don't use the Lemi Shine in the bottom.
2) In the main wash compartment, use 1/2 T Lemi Shine and 1/2 T of the detergent.
3) In the prewash compartment, use the other half T of the detergent and 1/2 T of vinegar.

This made for much better cleaning results and my glassware was much more clear.

I definitely recommend this! Who can beat the cost and how long it will last? Just don't give up after a couple loads if it's not up to your standards. If you put the money into it, you might as well try and see what combination and placement of the detergent, Lemi Shine, and vinegar (if you chose to use it) works for you!

If you have an experience with this detergent, or know of anything you'd do different, I'd love to hear about it!


Monday, January 30, 2012

Honey-Chipotle Wings

Who's excited for Sunday?! While I would have been more excited had the Saints been there, the Patriots are my number two! With that being said, anytime there is an inkling of pigskin in the air around here, you can bet wings are not far behind! What I'm going to share with you today is my coveted wing recipe. I'm pretty serious about my wings and for me to actually give this up is a huge deal. Enter my  Wings:


There is also a catch. You will probably have to sit through a quick soapbox of mine about food safety. Trust me, it's worth it! These wings have a double crunch, steeped in a mix of sweet and spicy saucy-ness, with juicy, tender meat and flavor all the way to the bone! Disclaimer: if you don't want to hear it, I suggest scrolling down to the next set of asterisks! However, there is some good info in here. Just saying!

*************Climbing on it now*****************
One of my biggest pet peeves is not practicing food safety in the kitchen. Chicken rubs me the wrong way most of all. Raw chicken, specifically. It completely blows my mind how some people are either A) completely oblivious to the dangers, or B) brush it under the rug and carry on like it's nothing. Salmonella is no joke, people! If you think so, I could gladly point you to some references! I've seen some pretty shocking things over the years when it comes to raw chicken. I know people who have forgotten to put it away when they got home from the grocery and then proceeded to cook it or put it in the fridge after it reaches room temperature. I've seen people eat chicken that they know isn't fully cooked. I've seen people chop up raw chicken, give the cutting board a quick rinse, and then chop up veggies on it...for a veggie tray! I know people that after handling raw chicken, just rinse their hands and then go around touching everything else in the kitchen that their family eats off of. My personal favorite is leaving it on the counter to defrost. I could come up with about 10 more, but for the sake of argument and time, I'll go on. The problem with all of this (for those of you that don't know) is the resiliency and tenacity of Salmonella. If contaminated, (and you'll never know until it's too late), it's impossible to completely rid the chicken of all of it before it's packaged to begin with.. Therefore, temperature is a huge issue. Keeping it at appropriate temperatures before cooking is very important. VERY IMPORTANT! Once it warms up to the "danger-zone" temperatures, which is between 45 and 140 degrees F, bacteria starts producing very rapidly. So at this point, you've grown your own little colony of gastrointestinal monsters. However, if it's not technically spoiled at this point, I guess that you turn around and cook and kill it all, right? You break out your meat thermometer and properly place it into the center of your meat to make sure that you've heated your poultry to at least 165 degrees F, right? Well, there you have it! "Dead Salmonella"! How do you know this exactly? Culturing bacteria before you eat to make sure? I mean, if you are taking all of these risks with your family, I'd assume that you are doing a little CYA in the process. Another one of my favorites is "my family has never gotten sick before". Really? So you mean to tell me that a case of stomach nasties hasn't come through and you said, "Must have been something I ate". CDC says it was more than likely something you prepared. Just a fun little fact to think about. This is just skimming the surface, but hopefully it gets someone's attention enough to do some further research if they are unsure or thought they have been doing things right for years.

So the point is, it's important to know proper food safety in any regard (chicken just happens to be a splinter in my finger). When you are in the kitchen, don't rush to get things done and take short cuts. Your family may be who pays the price. Especially little ones, our elderly, and our family with health problems to begin with. Before you give other people advice on things, make sure you know what you are talking about. Sitting that chicken out for 8 hours to defrost on the counter may just put someone in the hospital one day. Cross-contamination is a killer and just because you cook your chicken don't mean you kill all the bacteria. Super-bugs, people! We have made them!

Here's a good link if you haven't seen anything on food safety, or even if you have, it doesn't hurt to brush up on some things.
*************Coming Off My Soapbox Now****************

Now back to the wings...hopefully the term "Salmonella" didn't scare you away from them!  Because let me tell you, it may just be worth a night with GI turbulence for these bad boys! Maybe...anyway, onward we go!  First thing you need to know is if you are making these to be ready by 6ish in the evening, be prepared to get these started and soaking by 8 or 9 in the morning. You can get away with at least 4 hours of soaking, but you can certainly taste the difference between a batch of these versus a batch soaked for at least 8 hours.

What You Need:
1) Pack of Fresh Chicken Wings 
2) approx 3 tsp garlic powder
3)  approx 3 tsp onion powder
4)  approx 1 1/2 tsp salt
5)  approx 1 1/2 tsp pepper
6) 2 tsp at least of Tony Chachere's (more if you want more spice)
7) About 3 cups of buttermilk
8) 1/2 bottle honey-chipotle barbeque sauce
9) 1/2 bottle wing sauce (chose heat depending on your family's taste, but warning: the chipotle in the bbq and the Tony's add a nice kick, so take that into consideration)
10) Peanut Oil for frying (or your oil of choice, Peanut is just our flavor preference)
11) 2 cups flour
12) 2 T olive oil
13) 1/2 T honey

What You Do: 

For this batch, I only used half the package of wings for our family and froze the other half. As you can see, that's approximately 8 whole wings.


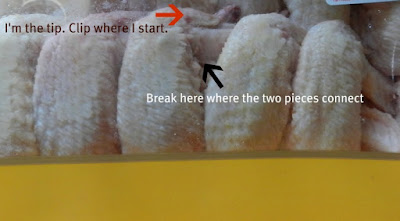
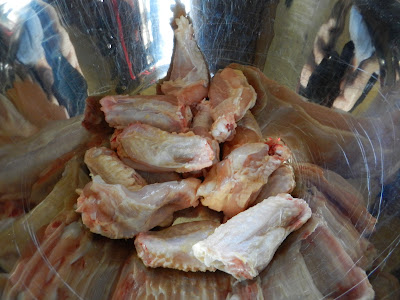
PROPERLY ;) prepare and divide the wings into their individual wing and drumette pieces. The easiest way to do it is to break through the joint connecting the two and then use kitchen scissors to cut it away from there. Cut the tip off as well. (If you've never dealt with wings, when you pull one out, the pic below will make a lot more sense.)


Depending on the amount of skin you like on your chicken, trim as desired. I always knock off big chunks and skinny down the sides a little. Place in a large bowl.


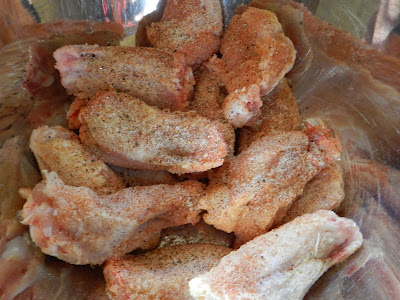
Next, add about half of each of the seasonings. Add more or less, depending on your tastes.


Now take 2 cups of the buttermilk and add it to the wings, pouring it along the SIDE of the bowl to let it fill. Push the wings down to make sure they are mostly covered.


Cover pan and place in refrigerator for at least 4 (I prefer at least 8) and up to 24 hours. 
In the meantime, it's imperative that you hunt down a Honey Badger shirt. It's true that wings taste best when prepared by someone wearing a Honey Badger T-shirt. Can't argue with science!


When you are ready to fry your wings, start heating the oil in your skillet/fryer to 375 degrees or Medium High. You also want to preheat your oven to 350 degrees. Yes, preheat your oven. 
Now measure out your 2 cups of flour into a bowl and add remaining seasonings and mix well. Here, I know we have enough Tony's when I can see red flakes in the flour after I've mixed it.


I like to set up a breading station by where I'm cooking to make things more accessible.
Here we have the flour mixture, a bowl with a cup of buttermilk, and then our wings.

I suggest reading through the next couple of steps and pics before moving on because I double bread.
First I take a few wings and coat them completely in flour.


Take the wings and dip them into the buttermilk bowl and give it a roll. Don't be too aggressive so you don't lose your first breaded layer.


Now toss the wings back into the flour and like with the last step, careful handling so you can get a nice breading on them. I like to place them in the flour and use a fork to toss the flour around it. 

After the second breading, immediately place them into the hot oil. I always flip mine when the golden edge creeps starts to creep up the sides.
When it's time to pull them from the oil, place them on a cookie sheet that has a paper towel-lined cooling rack in it. This is just a method I use with all my fried foods to ensure the most oil is pulled away from it.

   
While the wings are cooling to a manageable level, you can mix up the sauce. In a large bowl, mix 1/2 bottle of honey-chipotle bbq sauce, 1/2 bottle wing sauce, and I added about 1/2 tbsp of honey.


Next line a baking sheet with aluminum foil and pour a couple tablespoons olive oil in the center and spread to grease. Being slightly OCD, I also set up a little dipping station :)


Toss a few wings at a time in the sauce and place on the baking sheet. (If for some reason you missed it, make sure to GREASE WITH THE OLIVE OIL!!) 


Place in the oven for 10-12 minutes, depending on the performance of your oven. Serve with blue cheese, ranch, or whatever your heart desires!

I hope you enjoy these as much as we do!!!


Sunday, January 29, 2012

I'm NOT crazy! :)

Back in December, my husband and I made a very big purchase for our home. More specifically, for our kitchen. Even more specifically, it was cookware. If you have read any of my other posts, or know me personally, you already know what it was: A very popular brand of Titanium cookware. The pros: lifetime guarantee, much healthier cooking with low heat (retains most of the nutrients of your food), which leads into using less food thanks to a more nutrient dense meal, waterless/greaseless/oiless cooking (no added fat in your food, no water leaching vitamins/minerals from your veggies and fruits), every piece is dishwasher safe, every piece is oven safe up to 350 degree and if I want to cook above that I just remove the plastic handles, the ease of cleanup is unbelievable (stuck on food comes right off), and possibly the best part is the speed (tonight I cooked a FROZEN 2 lb roast with veggies that was fork tender and absolutely delicious in less than 3 hours). So you can probably see why it's worth the con. Yes, the CON, as in singular. The only negative is the cost. For all the pieces we purchased (and we got a few freebies) we paid...take a breath...$4200.00.

Why am I telling you this? Because, the way I see it, I invest in a new set of pots in pan set every couple of years anyway and spend close to 300 dollars. I also told my husband that just in the amount of money I could save in groceries every week (thanks to the food savings), I could make the money back! So that's what my Sunday is going to be...a journey to getting back $4200.00. Plan coming next Sunday....

And if anyone else uses titanium cookware, feel free to back me up on this one in the comment box below! Or if you have an awesome recipe you use in them, I'd love to hear about it!

Thursday, January 26, 2012

What I Want, Need, Have, Wish I Never Bought


Want: BonJour Creme Brulee Pro Culinary Torch
I often find myself in my kitchen thinking, I really would like to light that on fire. No, I'm not kidding! Some things are just awesome with a char on it before you cook it! Then the other day I ran across this http://traceysculinaryadventures.blogspot.com/2012/01/toasted-marshmallow-ice-cream.html
Are you joking? This is heaven, right? So after seeing this, that did it. I took myself on over to Amazon and put this bad boy on my wish list! I'd like to point out that my birthday is in two weeks, husband ;)


Need: KitchenAid Professional 600 series
I do a lot of cakes and bread. This 6 quart, 575 watt motor would certainly  be handy during these larger batches.


Have: KitchenAid Artisan Design 5 quart stand mixer
This is the bad boy that gets my everyday needs done. I, of course, use it with all my baking and the glass bowl is great to have since I can put it in the microwave. 


Wish I Never Bought: NONSTICK COOKWARE
Sure it's safe...when used properly and safely. How many of you know how to do that? The recommended temperatures on which to use it have actually been lowered and unfortunately don't coincide with how to properly cook our foods. A simple taste test will show you just how much of the chemicals leaks into your food. So now I use titanium cookware. The downside to this is the expense. Titanium is pretty pricey, so I've kept just a few of my "better" nonstick skillets until I can phase them out. Bear with me ;) I can assure you everything else is boxed up though! 

What are your thoughts on any of the above products?! Please share!!

Thursday, January 19, 2012

Kade's School Days!

Since today is Family Friday, I wanted to talk about my crazy baby girl and her kindergarten days. Okay, so she’s not a baby. A mom can dream, can’t she?! She just started back the second half of her kindergarten year and will be six in two months! Where is my baby?! She has grown so much in the last year and is so incredibly intelligent. She’s always been way ahead of herself and developed before other kids, so you wouldn’t think I’d be surprised by anything at this point. She manages!

The first day of kindergarten!


Showing off her backpack!


During the first field trip to the pumpkin patch...


Brother joined in on the fun!

And yes, she is the one of the tiniest, if not the tiniest one in her class (biggest attitude, I’m sure)


The first half of the school year was rather insane. The first week, she almost ran into the pickup line traffic, got dropped off at the wrong bus stop, and almost knocked herself out on the playground. For the first two months, I was called at least once a week because she was getting hurt (she’s rather clumsy) or something random and ridiculous has happened. It got to the point where if it wasn’t for her teacher, I would have pulled her out and started homeschooling. Now that we all got the swing of things, hopefully it goes smoother! We shall see. She’s only been back a week and a half and she got in trouble for not getting her work done because she was too busy socializing. Then she got in trouble for excess talking (she’s my child). However, after a good talking to and no tv for her three day weekend, she’s had a good couple days. I expect to be called next week. The upside: her teacher adores her, we adore her teacher, she’s way ahead of where she “should” be, and she loves school! 


But I still, and probably always will, see her as this:


Tuesday, January 17, 2012

What I'm Reading!


          So I am a little behind, as per the usual. I’ve got several crochet orders that I’m working on and haven’t been able to update this weekend. To keep myself sane, however, I have snuck in a little reading time! I am currently reading a book that is very different from your average love story. If you’re looking for a good book, I highly recommend this one! It’s called Before Ever After written by Samantha Sotto. I’m about ¾ of the way into it and I’ve laughed, cried, and become emotionally attached to the characters! After the death of her husband, a man shows up on Shelley’s doorstep looking exactly like her dead husband. But he isn’t. He claims to be his grandson and shows him pictures of him throughout his childhood. However, Shelley’s deceased husband was in his early 30’s when he died and couldn’t possibly be the same man. Or could he? Enter stories of past lives, or even more of the unthinkable, immortality, and a love that transcends time. They are currently on their way to the Philippines because he is believed to be there. It’s getting to the point where I’ll probably lose sleep over finishing it because I have too many other things going on, yet can’t put it down! I know sometimes I get stuck and want something different to read, so I thought I’d share what I’m currently reading!

Friday, January 13, 2012

Family Friday Time!


An Intro to Family Friday!!!
What family Friday is going to be is a day set aside for me to share whatever little tidbits/projects/pics/thoughts/goals/activities related to my family. I don’t want to hound you to death over cutesy pics and stuff of my kiddos. However, let’s face it; I have adorable babies and an awesome family, so it’s only fair that I show that dynamic. One day a week won’t kill you to hear about it! ;)
          And due to circumstances rendering me useless, that is all for today! At least we now know what Family Friday shall be, though, right?! 

Thursday, January 12, 2012

Settling In...Setting Up


It’s mid-January, and with the holidays over I can finally focus on getting a schedule going and rolling with the New Year! What would be very helpful is if the old year was all gone, e.g. all Christmas stuff put away. Yes, I STILL have Christmas stuff up! It’s rather ridiculous, but in my defense, I have been busy with crochet orders and other random things I’ve needed to get done these last two weeks.  And I just added plenty of fuel to the fire:

  1.       I accepted Cotton’s 1SG’s offer to make the cake for their “dining-in” for this MP ALC class for 70+ people (an offer which he extended for future “dining-in’s” as well! [hopefully that still stands after this :D])
  2.      I opened a new order for the cutest little crocheted turtles for newborns.
  3.  We finally found a 90’s style entertainment center! I’m turning this into a kitchen for Lainey. Best part: Free!
  4.  I registered for Spring Semester yesterday

And on top of that, here’s what we already have going on  the first half of the year:
  1. Next month,  that cake is due, my birthday, Love Day, marriage retreat, and my nursing entrance exam for this particular program I’m applying to (it’s never-ending).
  2.   March just may be the best month this year with: DISNEY WORLD (for the second time!), his cousin’s wedding, and New Orleans for a few days.
  3. April should be a calm month…JUST KIDDING. Nursing application for fall is due.  This is where I have to buckle down get my A-double-S in gear and study, study, study, (on top of all the studying for the spring semester I’ll be doing anyway), just in case my name is drawn out of the hat for clinicals and I have 8 weeks to test out of first year nursing. No. There was no typo there. EIGHT weeks to test out of first year nursing. Shoot me now.
  4.   May, my cousin’s wedding…studying continues.
  5.  Pending results from my nursing application and whether my name was drawn, I’ll keep you posted from here ;)

So seeing as how chaotic my life is, which it’s usually very similar to this, here’s how my blog theme is going to go down.
           
            MONDAY: OM NOM MONDAY (RECIPES! Either my own, or I’ll link up to some awesome ones I’ve done and highly recommend)

            TUESDAY:  TUTING/TOOTING TUESDAY (Either tutorial on whatever craft I’ve done, and if not complete, then I’ll toot my own horn about it and give you a sneak peak. If neither/nor applies [because there are times where I just want to chill out], I may toot (review) a book; makeup; product; household item; fashion; or whatever)

            WEDNESDAY: WORDLESS WEDNESDAY (You’ll see!)

            THURSDAY:  FREE DAY FOR WHATEVER MY LITTLE HEART DESIRES TO SHARE  :)

            FRIDAY: FAMILY FRIDAY (Once more, you’ll see!)

            SATURDAY: I’m taking the time away from the blog on Saturdays to regroup and spend with the family.

            SUNDAY: SALADMASTER PAYBACK (You’ll see! Although, I may regret it!)

So there it is! My version of organization in a blog. I feel better, because not only do you know what’s coming and what to expect, but I do too! Just an FYI, just like any college professor will tell you, this is subject to change at my discretion, so enjoy! 


Sunday, January 8, 2012

Whimsy Hooters


Fun little fact for the day: Owls have special feathers that are adapted to silent flight. Yes, sometimes I possess characteristics of the walking encyclopedia of useless knowledge. Regardless, owls are cool, super cute and according to Ryan Gosling, I started the owl craze. So taking this all into consideration, I whipped up a couple little stuffed owls that are perfect for little girls and/or little girls' beds. (I know this because my Kade sleeps with hers). These little guys are so easy to make, so I wanted to share! It also required hardly anything, but time! I got the fabric from the remnants section and it came with several other pieces of fabric (of which I'm using for tooth fairy pillows) for only 50 cents!

Materials Needed: 
Two colors/prints of corresponding fabrics (Cut as big as you like, but for an 8x5 inch owl, I used approximately 10x7 of fabric, allowing for the seam and fill expansion)
Corresponding thread
Whatever you choose to stuff it with (I forgot to get polyfill at the store, so I took an old stuffed animal apart, hehe)

           ******You may see some things doubled here because I made two at the same time! Hope this doesn't confuse anyone! I'll gladly answer any questions.

Here are my two fabrics:

Next, there is no particular pattern I followed, I just drew the shape of an owl onto the fabric (mind you, AFTER practicing on paper 30 times since drawing is the one thing I don't do!) after I ironed and got a nice crease in my fold line. Keep in my mind, I'm not concerned about it being perfect. It adds to the charm of it :) If I wanted perfect, I'd go to the store and then they'd just be Hooters and not Whimsy Hooters! So here's the shape I came out with.


Now it's time to cut out all of the features. Using the contrast fabric, cut out two circles for the eyes and two (yes, two) beaks, and from the main fabric, two smaller circle for the pupil (or use a button!) Using the side of the owl as a guide for the wing, I drew out the shape I wanted for them.


Now it's time to start sewing. Separate the two pieces of of fabric from your owl and work with what you want as the front of your owl.  Starting with the wings, pin them to the owl. I used just a straight stitch to attach the wings, then went over that with a zig-zag stitch for decoration. I also used some straight stitching from the edges, down into the wing to give the appearance of feathers.


Now that we have the wings on, we can proportionately place the eyes. Do not separate the two fabric pieces of the eyes. Following the same technique I used with the wings, straight stitch the eyes on. Then, I can't deceive you here, I cheated and used fabric glue to attach the pupils. After I let it set for a bit to dry, I followed the straight stitch of the eyes with a zig-zag stitch. As with the eyes, don't separate the pieces of the nose either. Straight stitch it on. 


Now this was cute and all, but when I was placing my pieces out onto my fabric, something caught my attention, I had cut extra beaks and one had flipped up, giving the illusion of the an open beak, so I went with it. I sewed the second beak closed and placed it on the other beak. Straight stitch it on and then zig-zag stitch on top of that.


 This was really the most of your work. Things should go quickly from here, providing two children, a husband, and two dogs don't need something every 5 seconds, but we know that's a little too much to wish for ;) Now we turn our fabric to the wrong side and pin it to the other piece of the body that we set to the side earlier, leaving an opening at the bottom of the owl about two inches so you can stuff it. Sew with a straight stitch. 


Now we have to turn the owl right side out. The easiest way way with this piece was to roll the fabric and pull it through the hole. 


You see that paint brush in the last picture? I happened to have that sitting around, so I ran the end of that through the inside seam to press everything out and point the ears really good. There is a tool you can buy specifically for this type of thing, but given the size of the project, it was completely unnecessary. 
Finally: stuff your owl and hand sew up the hole in the owl using a ladder stitch. 

And voila: Whimsy Hooters :)