


There is also a catch. You will probably have to sit through a quick soapbox of mine about food safety. Trust me, it's worth it! These wings have a double crunch, steeped in a mix of sweet and spicy saucy-ness, with juicy, tender meat and flavor all the way to the bone! Disclaimer: if you don't want to hear it, I suggest scrolling down to the next set of asterisks! However, there is some good info in here. Just saying!


*************Climbing on it now*****************
One of my biggest pet peeves is not practicing food safety in the kitchen. Chicken rubs me the wrong way most of all. Raw chicken, specifically. It completely blows my mind how some people are either A) completely oblivious to the dangers, or B) brush it under the rug and carry on like it's nothing. Salmonella is no joke, people! If you think so, I could gladly point you to some references! I've seen some pretty shocking things over the years when it comes to raw chicken. I know people who have forgotten to put it away when they got home from the grocery and then proceeded to cook it or put it in the fridge after it reaches room temperature. I've seen people eat chicken that they know isn't fully cooked. I've seen people chop up raw chicken, give the cutting board a quick rinse, and then chop up veggies on it...for a veggie tray! I know people that after handling raw chicken, just rinse their hands and then go around touching everything else in the kitchen that their family eats off of. My personal favorite is leaving it on the counter to defrost. I could come up with about 10 more, but for the sake of argument and time, I'll go on. The problem with all of this (for those of you that don't know) is the resiliency and tenacity of Salmonella. If contaminated, (and you'll never know until it's too late), it's impossible to completely rid the chicken of all of it before it's packaged to begin with.. Therefore, temperature is a huge issue. Keeping it at appropriate temperatures before cooking is very important. VERY IMPORTANT! Once it warms up to the "danger-zone" temperatures, which is between 45 and 140 degrees F, bacteria starts producing very rapidly. So at this point, you've grown your own little colony of gastrointestinal monsters. However, if it's not technically spoiled at this point, I guess that you turn around and cook and kill it all, right? You break out your meat thermometer and properly place it into the center of your meat to make sure that you've heated your poultry to at least 165 degrees F, right? Well, there you have it! "Dead Salmonella"! How do you know this exactly? Culturing bacteria before you eat to make sure? I mean, if you are taking all of these risks with your family, I'd assume that you are doing a little CYA in the process. Another one of my favorites is "my family has never gotten sick before". Really? So you mean to tell me that a case of stomach nasties hasn't come through and you said, "Must have been something I ate". CDC says it was more than likely something you prepared. Just a fun little fact to think about. This is just skimming the surface, but hopefully it gets someone's attention enough to do some further research if they are unsure or thought they have been doing things right for years.
So the point is, it's important to know proper food safety in any regard (chicken just happens to be a splinter in my finger). When you are in the kitchen, don't rush to get things done and take short cuts. Your family may be who pays the price. Especially little ones, our elderly, and our family with health problems to begin with. Before you give other people advice on things, make sure you know what you are talking about. Sitting that chicken out for 8 hours to defrost on the counter may just put someone in the hospital one day. Cross-contamination is a killer and just because you cook your chicken don't mean you kill all the bacteria. Super-bugs, people! We have made them!
Here's a good link if you haven't seen anything on food safety, or even if you have, it doesn't hurt to brush up on some things.
*************Coming Off My Soapbox Now****************
Now back to the wings...hopefully the term "Salmonella" didn't scare you away from them! Because let me tell you, it may just be worth a night with GI turbulence for these bad boys! Maybe...anyway, onward we go! First thing you need to know is if you are making these to be ready by 6ish in the evening, be prepared to get these started and soaking by 8 or 9 in the morning. You can get away with at least 4 hours of soaking, but you can certainly taste the difference between a batch of these versus a batch soaked for at least 8 hours.
What You Need:
1) Pack of Fresh Chicken Wings
2) approx 3 tsp garlic powder
3) approx 3 tsp onion powder
4) approx 1 1/2 tsp salt
5) approx 1 1/2 tsp pepper
6) 2 tsp at least of Tony Chachere's (more if you want more spice)
7) About 3 cups of buttermilk
8) 1/2 bottle honey-chipotle barbeque sauce
9) 1/2 bottle wing sauce (chose heat depending on your family's taste, but warning: the chipotle in the bbq and the Tony's add a nice kick, so take that into consideration)
10) Peanut Oil for frying (or your oil of choice, Peanut is just our flavor preference)
11) 2 cups flour
12) 2 T olive oil
13) 1/2 T honey
What You Do:
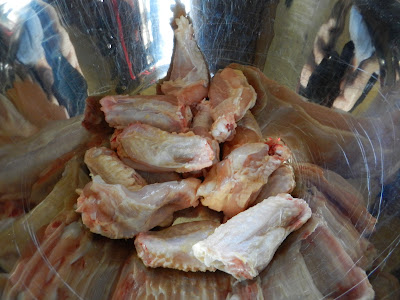
For this batch, I only used half the package of wings for our family and froze the other half. As you can see, that's approximately 8 whole wings.

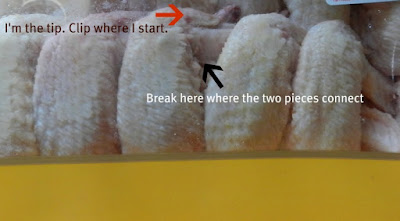
PROPERLY ;) prepare and divide the wings into their individual wing and drumette pieces. The easiest way to do it is to break through the joint connecting the two and then use kitchen scissors to cut it away from there. Cut the tip off as well. (If you've never dealt with wings, when you pull one out, the pic below will make a lot more sense.)
Depending on the amount of skin you like on your chicken, trim as desired. I always knock off big chunks and skinny down the sides a little. Place in a large bowl.

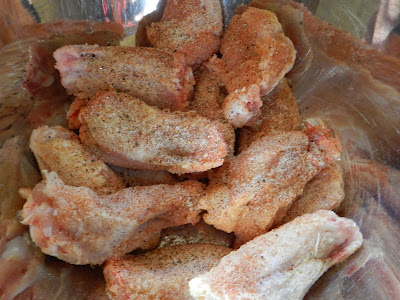
Next, add about half of each of the seasonings. Add more or less, depending on your tastes.

Now take 2 cups of the buttermilk and add it to the wings, pouring it along the SIDE of the bowl to let it fill. Push the wings down to make sure they are mostly covered.

Cover pan and place in refrigerator for at least 4 (I prefer at least 8) and up to 24 hours.
In the meantime, it's imperative that you hunt down a Honey Badger shirt. It's true that wings taste best when prepared by someone wearing a Honey Badger T-shirt. Can't argue with science!

When you are ready to fry your wings, start heating the oil in your skillet/fryer to 375 degrees or Medium High. You also want to preheat your oven to 350 degrees. Yes, preheat your oven.
Now measure out your 2 cups of flour into a bowl and add remaining seasonings and mix well. Here, I know we have enough Tony's when I can see red flakes in the flour after I've mixed it.
I like to set up a breading station by where I'm cooking to make things more accessible.
Here we have the flour mixture, a bowl with a cup of buttermilk, and then our wings.
I suggest reading through the next couple of steps and pics before moving on because I double bread.
First I take a few wings and coat them completely in flour.
Take the wings and dip them into the buttermilk bowl and give it a roll. Don't be too aggressive so you don't lose your first breaded layer.
Now toss the wings back into the flour and like with the last step, careful handling so you can get a nice breading on them. I like to place them in the flour and use a fork to toss the flour around it.
After the second breading, immediately place them into the hot oil. I always flip mine when the golden edge creeps starts to creep up the sides.
When it's time to pull them from the oil, place them on a cookie sheet that has a paper towel-lined cooling rack in it. This is just a method I use with all my fried foods to ensure the most oil is pulled away from it.

While the wings are cooling to a manageable level, you can mix up the sauce. In a large bowl, mix 1/2 bottle of honey-chipotle bbq sauce, 1/2 bottle wing sauce, and I added about 1/2 tbsp of honey.

Next line a baking sheet with aluminum foil and pour a couple tablespoons olive oil in the center and spread to grease. Being slightly OCD, I also set up a little dipping station :)

Toss a few wings at a time in the sauce and place on the baking sheet. (If for some reason you missed it, make sure to GREASE WITH THE OLIVE OIL!!)

Place in the oven for 10-12 minutes, depending on the performance of your oven. Serve with blue cheese, ranch, or whatever your heart desires!
I hope you enjoy these as much as we do!!!
Okay these remind me of Wings n Things from my college days! Please post at my Taste This Thursday party. www.bellmiracle.blogspot.com
ReplyDeleteyes.. if I were making them to watch the Eagles playing tomorrow I would be a lot happier.
ReplyDeleteYour steps, directions and pictures are fabulous!! clear simple and exact..thank you.
I am crazed about chicken too...I agree with your precautions!!
I am your newest follower..pls follow back if you can.
Thank you! I've received several emails in regards to the precautions. Apparently, I'm not the only one that's aware and cautious (maybe overtly so, but what's too safe?), so some of the isolated incidents I know of are made a little better since now I know it's not the entire population! :D
ReplyDelete